An
Instructor's Guide
to Sakai: Course Essentials |
Rich Text Editor
Many
screens in Sakai contain large text-entry boxes along with many icons
and pulldown lists (located above the actual text entry area). These
icons and pulldown lists make up what is known as a rich text editor.
Most of the tools in Sakai use a widely available rich
text editor that is displayed on your screen as shown here:
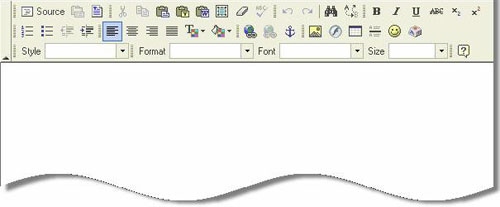
In some tools, you have the option of showing or hiding the rich text editor. If this option is available, a Show/Hide Rich-Text Editor link is displayed above the box. To show or hide the icons and pulldown lists, click the link.
Note that some of the buttons (and their functions) in the editor are not available in all tools in the Sakai. If you see a button, you can use it.
Text formatting
| To do this: |
Use this icon or field: |
Notes |
Select all (that is, select everything in the white box) |

|
|
Remove formatting from selected text |

|
|
Undo the last operation |

|
Undoes typing, color changes, and alignment; does not undo such functions as replace, apply style, and insert image; cannot be used repetitively. |
Redo the last operation |

|
Cannot be used repetitively. |
Use a template to create this material |

|
The editor displays a window from which you select the template you want to use. Three pre-defined templates are available to choose from. |
Apply bold formatting |

|
Text will look like this. |
Apply italic formatting |

|
Text will look like this. |
Underline text |

|
Text will look like this. |
Apply strikethrough formatting |

|
Text will look like this.
|
Make text subscript |

|
Text will look like this: x2 |
Make text superscript |

|
Text will look like this: x2 |
Insert numbered list |

|
|
Insert bulleted list |

|
|
Move margin left |

|
|
Move margin right |

|
|
Align text at left margin |

|
|
Align text at right margin |

|
|
Center text |

|
|
Align text at both left and right margins |

|
|
Change text color |

|
If you choose red, text will look like this. |
Change background color |

|
If you choose green, text will look like this. |
Apply one of five formatting styles |

|
|
Apply one of six formats to text |

|
|
Change the font |

|
|
Change the type size |
|
|
Adding and removing text, non-text items, and special characters
To do this: |
Use this icon or field: |
Notes |
Cut selected text |

|
|
Copy selected text |

|
|
Paste selected text |

|
|
Paste selected text as plain text |

|
|
Paste selected text from Word. |

|
Opens a window in which you paste text from a Word document, indicate whether to remove style definitions and/or remove fonts, and click OK to insert the text into the editor; inserts text and tables only; does not insert images from the Word source. |
Insert or change a link |

|
The editor allows you to link to a URL or FTP site, an anchor in the text, or an email address. Display text for the link will look like this: click here. For more information, see “Working with Links.” |
Remove selected link |

|
|
Insert an anchor |

|
When you are entering a large amount of information, you can use an anchor to link to a location in another part of the current page. For more information, see “Inserting a Link to an Anchor.” |
Insert or edit an image |

|
For more information, see “Inserting an Image or Flash Movie.” |
Insert or edit a flash movie |

|
For more information, see “Inserting an Image or Flash Movie.” |
Insert or edit a table |

|
|
Insert a horizontal line |

|
|
Insert a smiley face |

|
|
Insert a special character |

|
|
Miscellaneous
| To do this: |
Use this icon or field: |
Notes |
View or enter HTML source |

|
Displays the HTML code generated by the editor to produce the actual screen display. If you are familiar with HTML, you may view or enter it directly in the window after clicking this icon. To return to the regular display, click the icon again.
Do not paste HTML code created in Word into this editor. HTML code from Word may cause errors. |
Undo the last operation |

|
Undoes text entry, color changes, alignment, etc.; does not undo replace, apply style, insert image, etc.; cannot be used repetitively. |
Redo the last operation |

|
Cannot be used repetitively. |
Find the next instance of text you specify |

|
Searches forward from the cursor. |
Replace specified text with other text you specify |

|
Starts at the beginning of the text entry in the box, regardless of the location of the cursor. |
View information about this rich text editor software |

|
|
Display document properties |

|
This feature seems to be inactive. |
Working with Links The rich text editor allows you to create a link to a URL or other location such as an FTP site, an anchor you have created in the text, or an email address.
To link to an item stored in Resources, to an external URL (a link outside of the CLE), such as www.google.com or an FTP site, follow these steps:
Step 1: If you are linking to an external link and do not know the URL, find it and copy it.
Step 2: In the rich text editor, choose the display text you want to use for the link.
Step 3: Click the Insert/Edit Link icon (  ). The system displays the Link window. ). The system displays the Link window.
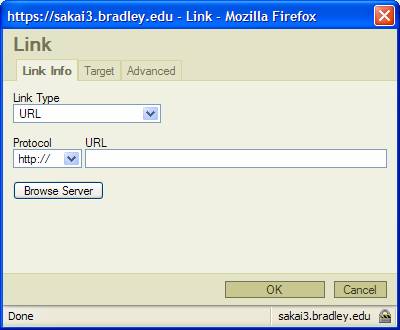
Step 1: Select the Link Info tab, near the top of the window.
Step 2: Select URL in the Link Type pulldown list.
• Use the Protocol pulldown list to select the appropriate protocol (usually http:// or https :// ).
Step 3: Choose one of these options:
• To link to an external URL (one not in the Sakai), type or paste the URL into the URL box.
• To link to an item stored in Resources, click Browse Server and click the item you want.
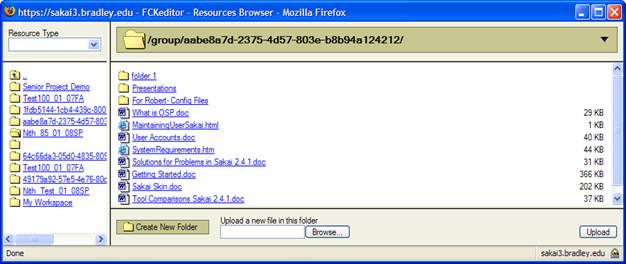
Note: In the Browse Server window, you may select another site to which you belong in the left window pane in order to access items stored in that site. You may also add a new folder and upload a new item to Resources by using the fields at the bottom of the screen.
Step 4: Click OK. Or, to exit without linking, click Cancel. If you clicked OK, the editor displays the text for the link (that is, either text you selected in step 2 or the URL itself) in the text box.
Inserting a Link to an Anchor
Linking to an anchor allows you to link to another area in the page you are creating with the editor. This is handy if you are using the text editor to enter a large amount of material and want the viewer to be able to quickly navigate from one place to another.
To link to an anchor, follow these steps:
Step 1: Position the cursor where you want the anchor (that is, at the place you want the link to take the viewer to).
Step 2: Click the Insert Anchor icon ( ).The editor displays the Anchor Properties window.
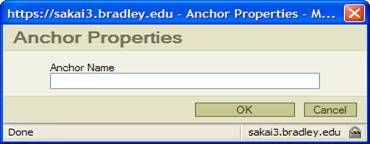
Step 3: Enter a descriptive name for this location in the Anchor Name box.
• Click OK to create the anchor . Otherwise, click Cancel.
Step 4: Scroll to the point where you want to insert the link text.
Step 5: Click the Insert/Edit Link icon ( ). The editor displays the Link window.
Step 6: In the Link Type pulldown list, select Link to anchor in the text.
• Use the By Anchor Name pulldown list to select the name of the anchor you want to use as the destination for the link.
Step 7: Click OK to complete the selection. Or, to exit without linking, click Cancel.
Inserting a Link to an Email Address Linking to an email allows viewers to click the link in order to send you an email. To link to an email address, follow these steps:
Step 1: Scroll to the point where you want to insert the link text .
Step 2: Click the Insert/Edit Link icon (  ). The editor displays the Link window . ). The editor displays the Link window .
Step 3: In the Link Type pulldown list, select Email.
Step 4: Click OK to complete the selection. Or, to exit without linking, click Cancel.
Inserting an Image You may insert an image and/or a flash movie directly into the material you are creating.
To insert an image, follow these steps:
Step 1: Position the cursor where you want the image to be displayed.
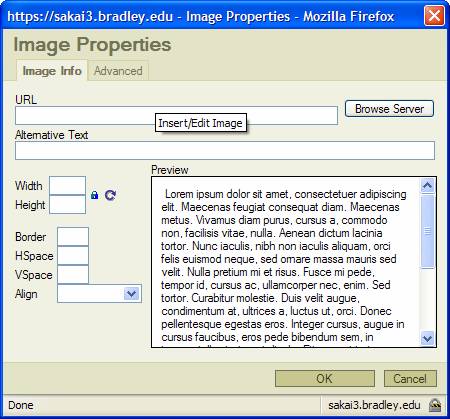
Step 2: Click the Insert Image icon (  ). The editor displays the Image Properties window. ). The editor displays the Image Properties window.
Step 3: Choose one of these options:
• To link to an external URL (one not in the Sakai), type or paste the URL into the URL box.
• To link to an item stored in Resources, click Browse Server and click the item you want.
Note : In the Browse Server window, you may select another site to which you belong in the left window pane in order to access images stored in that site. You may also add a new folder and upload a new image to Resources by using the fields at the bottom of the screen.
Step 4: Check the appearance of the image in the Preview box.
Step 5: To change the size of the image, enter numbers in the Width and Height boxes.
Step 6: To restore the size, click the Reset icon ( ). To lock this size, click the Lock icon ( ). To lock this size, click the Lock icon ( ). ).
Step 7: To add a black border around the image, enter a number in the Border box.
Step 8: To add blank space on both sides of the image, enter a number in the HSpace box.
Step 9: To add blank space above and below the image, enter a number in the VSpace box.
Step 10: To complete the selection, click OK . Or, to exit without linking, click Cancel.
Inserting a Flash Movie To insert a flash movie, follow the same steps as above, but choose the Insert Flash icon (  ) and expect the editor to display the Flash Properties window. This window offers fewer choices for changing the display than does the Image Properties window. ) and expect the editor to display the Flash Properties window. This window offers fewer choices for changing the display than does the Image Properties window.
TOP |
